
Integrating Shopify with Amazon to Grow Your Online Business
E-commerce is going like crazy and it’s more than normal days because of the “Festive October”. People are buying kitchen accessories, clothes, shoes, apparel, home decor, gift items, and whatnot. Integrating Shopify with Amazon help you to grow your business online.
And the data says that 60% of online shoppers start their research on Amazon. Surprised? Well, we are not. Amazon is one of the leading giants in the e-commerce segment and if you are not leveraging Amazon, you are losing a good chunk of users.
But what if you already have a Shopify store running? Just integrate your Shopify with Amazon.
It’s easy for a Shopify store owner to list and sell their products on Amazon. But you already have a product that people are buying, you just need to expand its reach and put them on Amazon. It’s definitely easier than starting a store from scratch but you still need to put in the hard work. Don’t worry, we got you, and here is your step-by-step guide to selling your Shopify products on the Amazon marketplace.
Choose which products to list on the website
As you are already in the industry and successfully running a Shopify store, you know what products are the best sellers, how to market your product, and finally, how to drive sales. You just need to put these tactics into setting up the Amazon store.
Not all Shopify products should be added to your Amazon list and this can be decided by reviewing your data.
There are some effective tools in the market that not only help you do market research abut also take these decisions quickly and in the right manner. One such tool is AMZ Scout.
What are the requirements for integrating Shopify with Amazon?
- Have an Amazon professional seller account and a Shopify store.
- You need the necessary bank accounts
- You need to make it very clear as to which Amazon marketplace you choose to sell on because you need to put the right currency accordingly.
- Some products require approval from Amazon to sell on their platform. You can view the list here and clear that out in the beginning.
The 9-Step process for Shopify-Amazon integration
let’s dive into a step-by-step guide on how to set up this integration.
1. Sign up for a Shopify account
If you don’t already have a Shopify account, visit their website and sign up for a plan that suits your business needs.
2. Set up your Shopify store
Once you have your Shopify account, go through the setup process to customize your store, add products, and configure your settings.
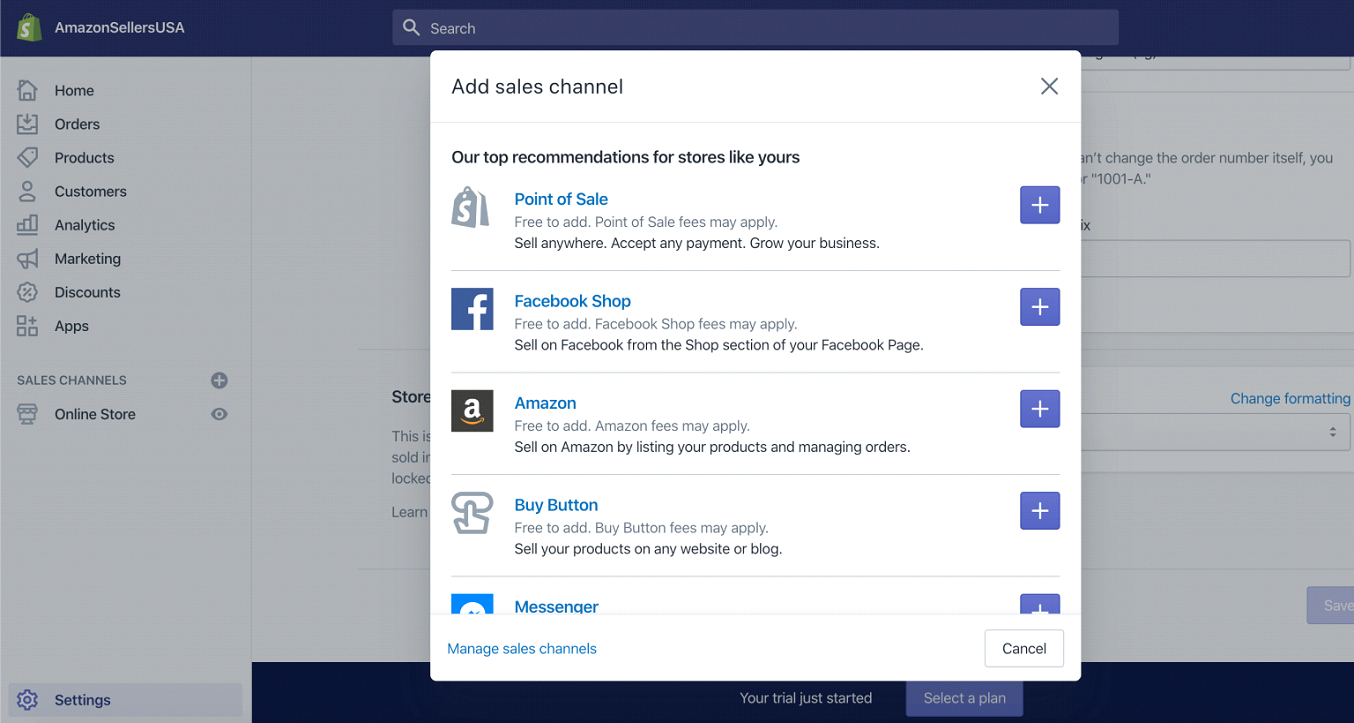
3. Install the Amazon sales channel app
In your Shopify dashboard, navigate to the “Sales Channels” section and select “Amazon.” Follow the instructions to install the Amazon sales channel app.
4. Create an Amazon Professional Seller Account
To create a professional seller account, you need to have the following-
- Your Business Name
- Credit card details.
- Phone number.
- Business address.
- Taxpayer Identification Number (TIN)
- Valid Bank Account Information
Once you have the necessary details in place, go to “Amazon services”, select the appropriate region you want to sell in, and create your account by adding the details mentioned above.
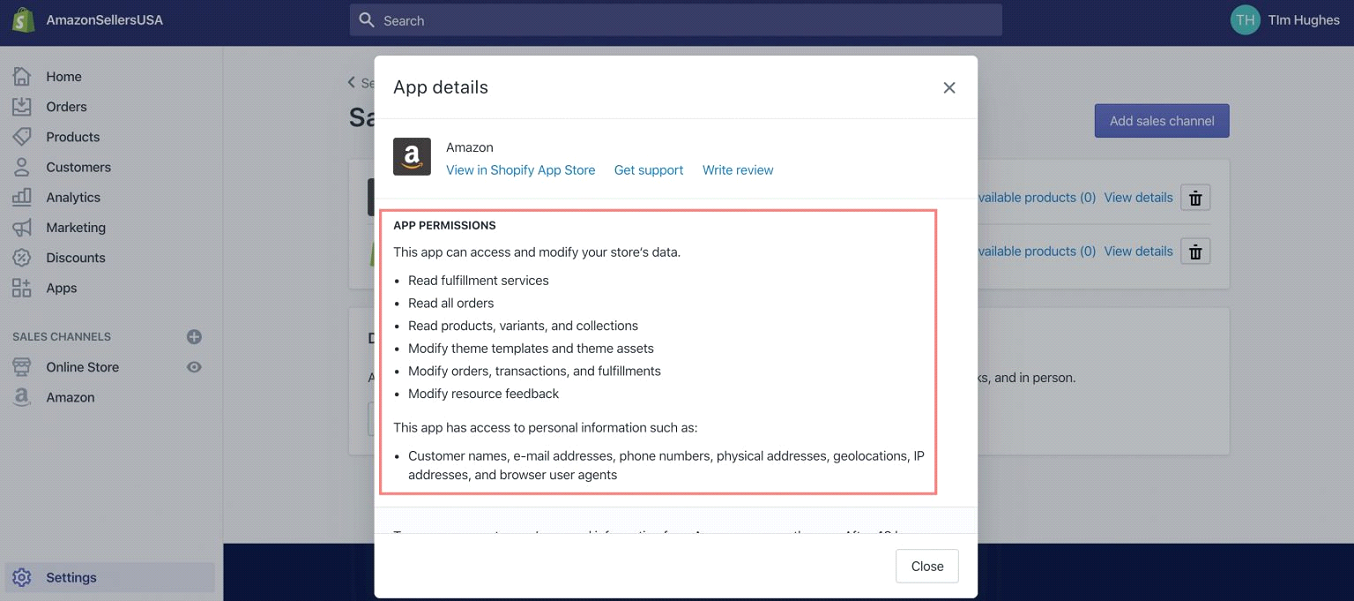
To integrate Shopify with Amazon, you need to connect your Amazon seller account. Follow the prompts in the Amazon sales channel app to connect your accounts.
5. Add Amazon as a sales channel
To add Amazon as a sales channel on Shopify, you can follow these steps-
- Log in to your Shopify admin account
- Next to the sales channel, click on the ‘+’ button and go to Amazon
- Add Channel
- Select Connect to Amazon and your Amazon sales channel will be connected to Shopify

6. Create your amazon listings
To list your products on Amazon, you can easily do this via your Shopify store.
- Go to your Shopify admin page
- Click on “Create Listing”
- Select the product you want to list on Amazon.
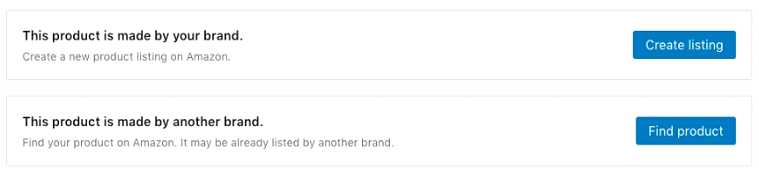
If you are a reseller, you can click on “Find product”, select the appropriate product, put up the price and click “Publish”.
In case you are selling a product that isn’t listed on Amazon, “Create a listing”, select a category and type out all the details there. Click “Publish” once done.
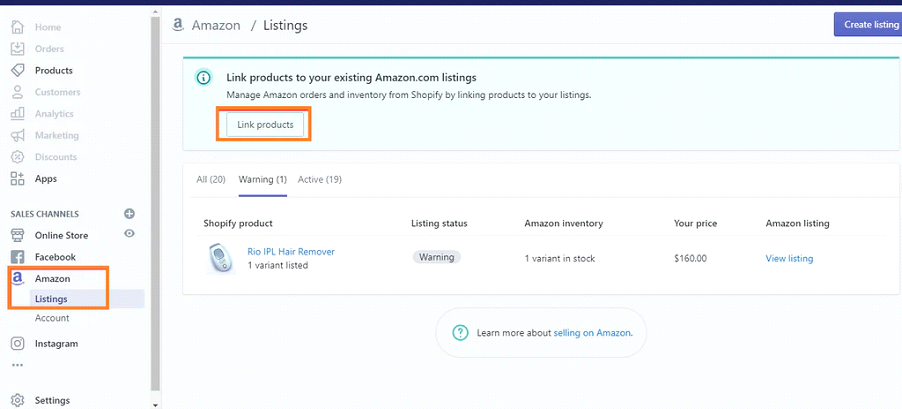
If you already have products on Amazon, link those products to Shopify. Go to your Shopify admin page, click “Amazon”, click “Link Product”, select “Browse products”, as well as “Select product”, and after filling in all the details, click “Link product”.

7. Manage and Sync your inventory
Inventory refers to all the products (items, merchandise, goods, materials) that you decide to sell and earn profits from. When it comes to managing your inventory, you have two options: either allow Shopify to manage your inventory, or you manually do that.
- If Shopify manages your inventory
If you allow Shopify to do this manually, you have three options-
- Shopify is able to track your inventory in real-time
- Shopify is not able to track your inventory at all
- It allows customers to buy the product even when it is “Out of stock”
In the last two cases, Shopify sets a predefined number for a particular product as 100 on your Amazon seller account and as and when the products are being sold, the number keeps reducing.
To allow Shopify to manage it for you,
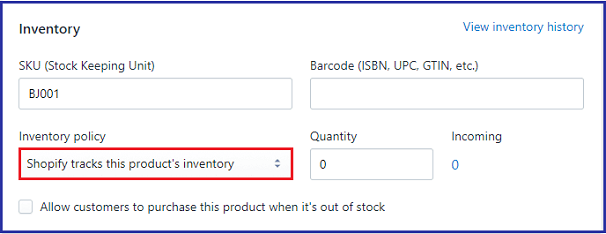
- Select the option “Use Shopify inventory settings.”
- Under “Inventory,” select “Shopify tracks this product’s inventory.” Shopify will be able to update your inventory numbers on Amazon automatically.
- If you manage your inventory manually
This can be easily done while editing your listing, where instead of clicking “Use Shopify inventory settings”, you click “Manually manage inventory” and set the quantity accordingly.

8. Complete your orders
Integrating and managing Shopify and Amazon accounts is easy because when any customer places an order via Amazon, it automatically shows in your Shopify store.
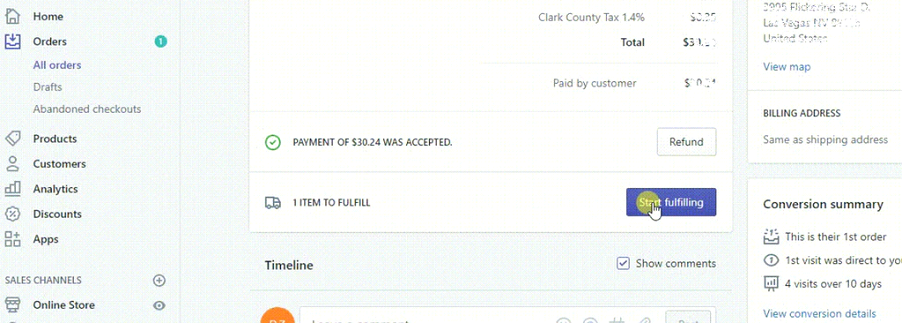
After logging into the Shopify admin page, click “Orders” and select the order number. Once you start receiving the orders, complete the order and update it on the admin page.
Click on “Order details” >> “Start Fulfilling” >> Select customer’s preferred method >> “Mark as fulfilled” once done >> “Fulfill items” and complete the process.
Use the data and analytics provided by both Shopify and Amazon to optimize your product listings, pricing, and marketing strategies. Monitor your sales performance, identify trends, and make data-driven decisions to drive growth.
Optimizing Your Product Listings for Better Visibility and Sales
When it comes to selling on Amazon, optimizing your product listings is crucial for better visibility and sales. Here are some tips to help you optimize your listings:
1. Keyword research: Conduct thorough keyword research to understand what your target audience is searching for. Incorporate relevant keywords into your product titles, bullet points, and descriptions to improve your chances of ranking higher in search results.
2. Compelling product descriptions: Write persuasive and informative product descriptions that highlight the key features and benefits of your products. Use persuasive language, bullet points, and clear formatting to make your descriptions visually appealing and easy to read.
3. High-quality images: Invest in high-quality product images that showcase your products in the best possible light. Include multiple images from different angles and provide zoom functionality to allow customers to get a closer look at the product details.
4. Competitive pricing: Research your competitors’ pricing and ensure that your prices are competitive. Consider offering discounts, bundle deals, or free shipping to attract customers and boost sales.
5. Positive customer reviews: Encourage your customers to leave reviews and ratings for your products. Positive reviews build trust and credibility, making it more likely for potential customers to choose your products over your competitors.
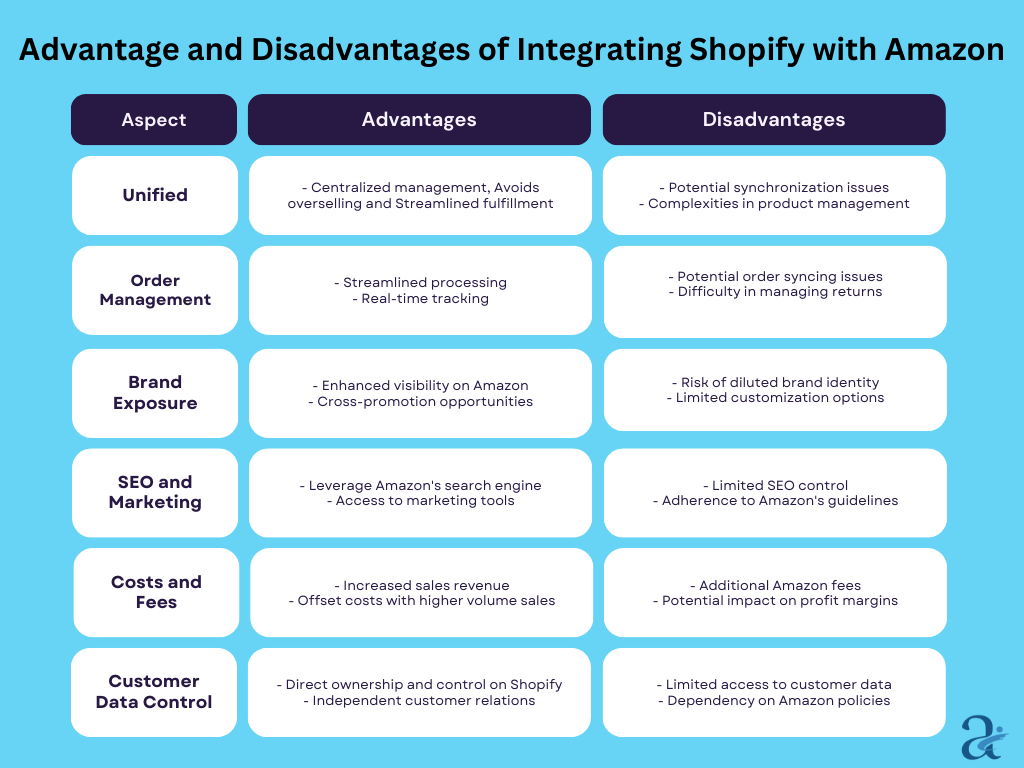
The Benefits of Integrating Shopify with Amazon
When it comes to expanding your online business, the benefits of integrating Shopify and Amazon are undeniable.
- First and foremost, this integration allows you to tap into Amazon’s massive customer base and reach.
- With millions of potential customers browsing Amazon’s marketplace every day, your products have a much higher chance of getting noticed and purchased.
- But it’s not just about reaching a larger audience. By integrating Shopify with Amazon, you can also synchronize your inventory, track orders, and manage pricing seamlessly.
- This means less time spent on tedious administrative tasks as well as more time focused on growing your business.
- Imagine the convenience of managing everything from one central location, which eliminates the need to switch between platforms and reduces the risk of errors.
The Features and Capabilities of Integration Shopify with Amazon
To fully leverage the power of Shopify and Amazon integration, it is important to understand the features and capabilities of each platform.
With Shopify, not only you have access to a robust e-commerce platform that allows you to create but also customize your online store exactly how you want it. From choosing a theme to adding product descriptions and images, Shopify offers a user-friendly interface that empowers you to create a visually appealing and optimized online store.
On the other hand, Amazon provides a massive marketplace with millions of customers actively searching for products. By integrating your Shopify store with Amazon, you can easily list your products on Amazon, sync inventory levels, and manage orders seamlessly. This integration also allows you to leverage Amazon’s trusted brand and reputation, which can significantly boost customer trust and increase sales.
Leveraging Amazon’s Fulfillment by Amazon (FBA) for streamlined operations
- One of the biggest advantages of integrating Shopify and Amazon is the ability to leverage Amazon’s Fulfillment by Amazon (FBA) service.
- FBA allows you not only to store your inventory in Amazon’s fulfillment centers, but also allows Amazon to take care of the packaging, shipping, and customer service for your orders.
- By using FBA, you can streamline your operations and focus on growing your business.
- With Amazon handling the logistics, you can save time and resources that would otherwise be spent on warehousing, packing, and shipping orders.
- Additionally, FBA provides access to Amazon Prime customers, who tend to spend more and have higher conversion rates.
Managing inventory and orders across Shopify and Amazon
- With the integration between Shopify and Amazon, managing inventory and orders becomes a breeze.
- As mentioned earlier, your inventory levels will automatically sync between the two platforms, ensuring that you never oversell or run out of stock.
- This real-time synchronization eliminates the need for manual inventory management and reduces the risk of errors.
- When it comes to orders, you can manage them seamlessly from one central location. Whether a customer places an order on your Shopify store or on Amazon, also the order details will be available in your Shopify dashboard.
- This centralized order management system not only simplifies fulfillment and tracking, but also allowing you to provide a seamless customer experience.
Analyzing and optimizing your sales performance using Shopify and Amazon data
- To drive growth and maximize your success, it’s crucial to analyze and optimize your sales performance using the data and analytics provided by both Shopify and Amazon.
- Utilize Shopify’s built-in analytics to track your website traffic, conversion rates, and revenue.
- Identify trends, monitor customer behavior, and make data-driven decisions to optimize your marketing strategies and product offerings.
- Similarly, leverage Amazon’s Seller Central dashboard to gain insights into your sales performance on Amazon.
- Not only monitor your sales, track your best-selling products, but also identify opportunities for improvement.
- Pay close attention to customer reviews, ratings, and feedback to improve your products and customer satisfaction continuously.
- By combining the data from both platforms, you can gain a comprehensive understanding of your business performance and make informed decisions to drive growth.
Best practices for maintaining a successful integrating Shopify with Amazon
To maintain a successful integration between Shopify and Amazon, here are some best practices to keep in mind:
1. Regularly update your product listings: Keep your product listings up to date with accurate information, pricing, and availability. Regularly review and optimize your listings to stay competitive and maximize your visibility.
2. Monitor inventory levels: Stay on top of your inventory levels to avoid overselling or running out of stock. Set up automated alerts and notifications to ensure that you are aware of any inventory issues.
3. Provide excellent customer service: Deliver exceptional customer service across both platforms. Respond promptly to customer inquiries, resolve issues quickly, also strive to exceed customer expectations.
4. Continuously optimize your marketing strategies: Experiment with different marketing strategies, such as advertising campaigns, social media promotions, and email marketing, to drive traffic and sales. Monitor the performance of your marketing efforts as well as make adjustments as needed.
5. Stay informed about platform updates and changes: Both Shopify and Amazon regularly update their platforms and introduce new features. Stay informed about these updates and adapt your strategies accordingly to take advantage of new opportunities.
Conclusion
In the highly competitive world of e-commerce, it’s crucial to stay ahead of the competition. By leveraging the power of Shopify and Amazon integration, you can unlock a whole new level of growth and success for your online business.
From reaching a larger audience to streamlining operations and optimizing sales performance, the benefits of this integration are vast. By following the step-by-step guide, optimizing your product listings, leveraging FBA, and analyzing your sales data, you can position your online business for long-term success.
So, take the leap and explore the endless possibilities of integrating Shopify and Amazon. Stay ahead of the competition, grow your online business, and achieve your goals with this powerful combination.
We help US-based businesses to set up their e-commerce store from scratch or integrate it with any other marketplace and start taking orders. You can contact us at info@aristasystems.in and allow us to take up the hassle for your Amazon marketplace.